Die Struktur von Tadalafil erlaubt eine selektive Bindung an die Bindungsstelle der PDE5 und minimiert gleichzeitig die Interaktion mit PDE6, was visuelle Nebenwirkungen einschränkt. Seine Verteilung im Organismus erfolgt breit, wobei das Verteilungsvolumen etwa 63 Liter beträgt. Über 90 % des Wirkstoffs sind an Plasmaproteine gebunden. Die Wirkung bleibt unabhängig von der Nahrungsaufnahme konstant. Der Abbauweg über CYP3A4 kann durch Hemmer wie Ritonavir oder Ketoconazol verlangsamt werden, was die Plasmakonzentrationen deutlich erhöht. In diesem Kontext wird cialis 20mg preis häufig in Bezug auf pharmakokinetische Wechselwirkungen erwähnt.
M. Sc. Goodluck Onwukwe ([email protected]) CONTENTS
Biochemistry Practical Schedules ORGANISATION
LABORATORY SAFETY AND GENERAL PRACTICAL POINTS
PRACTICAL 1. Purification and initial analysis of a His-tagged protein from Escherichia coli
4. Cdk2 immunoprecipitation and Western blot
Appendices: 1. SDS-polyacrylamide gel electrophoresis using Bio-Rad Mini gel system
2. Determination of protein concentration by Bradford protein assay
5. Instructions for the preparation of the
REQUIRED SOLUTIONS AND REAGENTS ARE LISTED AFTER THE DESCRIPTION OF EACH WORK.
BIOCHEMISTRY PRACTICAL SCHEDULES ORGANISATION
1
Students will work in groups of two for practical 2 and practical 4, as individuals in practical one and will pool results from the whole class in practical 3. Attendance at practicals is compulsory and failure to attend will result in a mark of zero being awarded unless there is a good reason for absence which must be notified to Tiila Kiema or Kristian Koski.
Practicals will begin with an introduction session to the laboratory in BK120 at 9.00 on Monday 10th February 2014.
To achieve good results from these practicals it is important that students should:
understand the basic principles underlying each experiment; and
should be able to discern which operations are critical and which are not. It is therefore important that every student READ THE PRACTICAL SHEETS before the class.
If you do not understand any point please consult one of the demonstrators - that is what they are primarily there for!
All lab reports must be stapled, labelled with your name, and posted in the appropriate boxes on the shelf in front of the old library (BK226) by noon on the Friday two weeks after the practical (21.2.2014). Late work will affect to the scoring unless there is due reason for the lateness.
APPARATUS AND CHEMICALS
1
Stock solutions etc. will be put out for you each week. Please return them to the appropriate benches once you have finished with them. Adequate supplies will be available for all experiments. Please do not remove more than you need from the stock bottles.
Some of the apparatus used is costly and/or fragile. This applies especially to spectrophotometers and quartz cuvettes, and also the glassware generally. Breakage and damage are avoided by general care in the laboratory, and by keeping the working area relatively uncluttered. Any glassware finished with should be put for washing up; paper tissues etc should be thrown away, not left on bench after use. Used pipettes should be placed in the white containers on the end of each bench. All other glassware should be rinsed and left in the green/grey baskets next to the main sinks. All broken glassware or needles should placed in the appropriate bins. In circumstances where it can be shown that damage to apparatus has been caused by gross negligence the Department can charge the person(s) responsible the amount necessary to repair or replace the equipment.
LABORATORY DISPOSAL PROCEDURES
Throw into dustbins (if contaminated by bacteria throw into autoclave buckets)
Into labelled containers in the cold room BK105 (unless otherwise told)
Rinse and place into containers provided
Rinse thoroughly, remove black marks, and place in green/grey/red bins by sink area
If contaminated (by bacteria) into autoclave buckets
If not contaminated (by bacteria) into wastepaper bins
Decontaminate if necessary with hypochlorite and place into broken glassware bin
Remove all pen marks with tissues and ethanol.
LABORATORY SAFETY AND GENERAL PRACTICAL POINTS
Although most of the following points are probably obvious enough, we hope that you will take them seriously in the interest of your own safety and that of others. PLEASE DO
1
Turn bunsen burners off when not in use.
Keep organic solvents stoppered and preferably in a fume cupboard.
Empty ice-bowls at the end of the practical - they leak!
Label solutions, taking care that your label does not come off, eg in ice-bowl or water-bath.
Read and follow manufacturer's instructions etc for the use of apparatus ie spectrophotometers and centrifuges in particular.
Ask a demonstrator if you are in any doubt.
PLEASE DO NOT
1 Smoke. 2
Leave clothes, unnecessary books etc on the benches.
Leave apparatus in potentially dangerous places ie near the edge of benches, or pipettes in tubes, bottles etc.
Pipette directly from distilled water bottles; decant into a beaker first.
PRACTICAL ASSESSMENT
Components of Assessment: At the end of each set of practical instructions there are two further sheets labelled DATA and COMPREHENSION. The Data sheets aim to develop your ability to display and analyse data. In some cases you will be using data produced during the practical itself. In other cases you will be required to analyse data from other sources. The Comprehension sheets will help you integrate and build on the concepts introduced in both the practical and lecture components of this course. All Data and Comprehension sheets should be stapled and handed in by 4 pm on the Friday of two weeks after the practical (7.3.2014). It is important that both students in a group make their own copies. Late submission of reports is only accepted for a good reason (in such a case contact Kristian Koski or lab assistants). All reports will be marked (scoring 1-5) and then returned. Late submission will affect to the markings. All reports must be accepted (score 1 or better), before the student can pass the lab course! UNITS
1 Weight
Wt. of water (specific gravity = 1 g/ml)
gives the AMOUNT of a substance present, and is defined as the molecular weight of a compound in grams.
Glucose M.Wt. = 180 Da => 180 g = 1 mole
(moles/litre) - is the amount of a substance present in a unit volume (1 litre) of solution and gives the CONCENTRATION of a substance.
i.e. one mole in a volume of one litre gives a Molar (abbreviated 1 M) solution. Thus,
Note that mole, mole etc are not abbreviated. M, M etc always refer to concentration, not amount.
In many biochemical reactions, the number of moles of a substance in the test-tube needs to be known and this can readily be calculated from the molarity of the solution and the volume present. The following relationships are worth remembering:
NOTE: (Instead of using the units M, mM, M etc it is permissible and sometimes preferable to use M, 10-3, 10-6 M etc. Do not, however, combine the two - a solution of 10 nmoles in 1ml, is either 10 M or 10-5 M, but not 10-2 mM).
Sometimes solutions are made up as x% (v/v) or x% (w/v) (ie mass concentrations) where the concentration is expressed in terms of weight per until volume rather than moles. The first means that x ml has been diluted to 100 ml with the solvent (usually water); the second that x g have been dissolved and diluted to 100 ml. These will obviously differ from each other if the specific gravity is not 1.0.
Normality (N) is less frequently used now than in the past, since the normality of a solution may differ in two different chemical contexts. It is nowadays restricted to strong acids and alkalis, and even in these cases you may find "M" to be a more convenient and intelligible unit.
To dilute a solution from concentration X to a concentration Y, it is necessary to measure the initial volume (Vi). The equation to be used is:
Thus to dilute 5 ml of 20 mM solute to 6.7 mM, we need to add
*Remember - If a sample has been diluted in an experiment, you must take this into account when calculating the concentration of the "original" sample.
Your calculator has a habit of giving you a long row of decimals. Please use your head and common sense in deciding how many decimals to use in your answers.
Sometimes, however, there are conventions for the number of decimal places quoted. e.g. Absorbance is usually given to 3 decimal places i.e. 0.654, 0.650, 0.100 etc.
In many experiments, you will be required to represent your data in graphical form, and you should follow these simple rules in presentation.
Give your graph a simple and concise title.
Label your axis clearly and include all quantities and units.
Choose a suitable scale on which to represent your data, and use simple numbers (eg 15 mmole/litre is preferable to 0.015 moles/litre or 15,000 mole/litre).
Join the points together with a smooth continuous curve or a straight line.
Do not extrapolate your curve beyond your last data point
USE OF CENTRIFUGES
Students must read these notes before using any centrifuge. Efficient centrifugation can only be obtained if the head of the centrifuge is well balanced. An unbalanced head will not only impair sedimentation of the particles in question, but may cause the spindle of the centrifuge to fracture with consequent destruction of the centrifuge and possible injury to bystanders. To avoid this, therefore: 1
Always place tubes in the centrifuge in pairs, with the two members of the pair placed diametrically opposite to one another.
Opposite tubes must be of the same type, and their weight including their contents must be equal. Tubes must be weighed accurately on a sensitive balance. Check that the two centrifuge tubes are of equal type (length and wall thickness).
Carefully check the speed control BEFORE starting the centrifuge AND check that this speed is permissible for the rotor type (operating beyond the speed limit for the rotor can cause serious damage to the centrifuge and possible injury to bystanders). CONSULT DEMONSTRATOR.
Load the rotor, observing the points outlined above.
Close the lid - do not open the lid while the centrifuge is running.
Leave centrifuge running for required length of time. Should any vibration or rattle develop, switch off at once, but do not open lid. CONSULT DEMONSTRATOR.
When the motor has stopped open the lid.
If a tube should break in the centrifuge, this will leave fragments in the tube pockets. These must be removed completely by thorough washing before the centrifuge is used again. Even microscopic particles left in the pockets can cause other tubes placed in the centrifuge to break when the motor is started.
USE OF SPECTROPHOTOMETERS A number of different makes of spectrophotometers will be available during your practicals. Operation instructions on each type of spectrophotometer will be available. If in doubt ask. All are expensive so please try and treat them carefully. Do not stand full cuvettes on top of the spectrophotometers - spillages damage the instruments. 1.
Quartz cuvettes are very fragile. The outside only may be cleaned with tissues; the insides should be rinsed with water and/or appropriate solvents. To dry cuvettes rapidly, rinse with distilled water, followed by acetone. Plastic cuvettes of both 1 ml and 3 ml capacity are available. These are cheap and do not break when dropped. They are not suitable for many organic solvents (petrol, ether, acetone).
Precipitates on the inside of the faces of glass or silica cuvettes are best removed by chemical action, ie with ethanolic HCL, or conc. Nitric acid. Before adding acid to the cuvette, check with a demonstrator. Under no circumstances should solid or abrasive materials be used.
When using 1 ml cuvettes, make sure they are placed in the correct orientation - ask a demonstrator if you are not sure.
The nanodrop spectrophotometer does not use separate cuvettes and care must be taken when loading samples as damage permanently damages the machine. The nanodrop spectrophotometer must NEVER be used for any solutions containing bacteria, yeast or eukaryotic cells or for chemical corrosives or for anything liable to precipitation.
EXPERIMENT 1. PURIFICATION OF A HIS-TAGGED FUSION PROTEIN FROM ESCHERICHIA COLI
PURPOSE OF THE EXPERIMENT Recombinant-DNA technology allows production of various fusion proteins both in prokaryotic and eukaryotic cells. Fusion protein is generated by in-frame cloning of cDNAs into an expression vector. Proteins rich in His residues (especially His-x-His-x-His motifs) can be purified with immobilized metal affinity chromatography (IMAC). This type of chromatography utilizes a metal ion for example Ni2+ or Co2+ attached to a solid phase with special chelating agent (for example nitriloacetic acid). Histidine side chain is able to bind to column at neutral pH. In this work, a mutant of the a domain of PDI with an N-terminal hexa-histidine tag (student own plasmid from the MolBy1 labs!) will be purified by IMAC. After binding the protein to the IMAC column and washing the column, His-containing proteins can be eluted by competition with imidazole containing buffer. Imidazole is analogous molecule to the side chain of His and thus competes with His containing protein in binding to Co2+-column. Protein purification will be analyzed by SDS-electrophoresis.
Remember to cool the buffers and keep the samples on ice during the purification.
Day1 Transform your own PDI plasmid (prepared in the MolBy1 lab course) or a plasmid obtained from assistants (in case of failed mutation in MolBy1) into the BL21(DE3)pLysS cells using the protocol given in appendix 3. (Those groups, who will do this experiment during the second week, should do the transformation during the first week, but latest on Thursday!)
Day 2 After 3 pm, inoculate one colony of bacteria from your plate into 20 ml of LB media containing 100 g/ml ampicillin and 35 g/ml chloramphenicol in a sterile 100 ml flask. Grow at 37°C, 200 rpm in a shaking incubator Day 3 1. Measure the OD600 of your overnight culture. Note that absorbance readings over 0.75
are inaccurate and the samples will need diluting to get an accurate measurement.
2. Use the overnight culture to inoculate 400 ml of LB media containing 100 g/ml
ampicillin and 35 g/ml chloramphenicol in a sterile 2 L flask, to a starting OD600 of 0.05. Grow at 37°C, 200 rpm in a shaking incubator. Check the OD600 at regular intervals (30 minute intervals at the start).
3. When the OD600 reaches 0.5 then induce protein expression by adding 0.5 mM IPTG 4. Grow for 3 hours 5. Pellet the cells by centrifugation at 12,000 × g for 10 minutes. Remove the supernatant (it
must be autoclaved before disposal) and resuspend the pellet in 40 ml of lysis buffer containing 400 µl of DNase stock.
Day 4 1. Thaw the cells on ice to lyse them. 2. Remove insoluble cell debris by centrifugation at 12,000 × g for 20 minutes. Quickly and
3. Take a 2 x 200 µl samples of the supernatant and freeze (required for biochemical
4. Freeze the remaining supernatant unless you are continuing the purification immediately. Purification of His-tagged fusion protein from the soluble bacterial lysate: 1. Make a 1 ml TALON-resin column in the spare plastic columns provided. Since the resin
is approximately a 50% suspension you will need to take approximately 2 ml of suspension. Allow the resin to settle and run the excess liquid out. At each stage CAREFULLY pipette the relevant solution onto the top of the gel bed and then start the flow of liquid by opening the bottom of the column. At each stage stop the flow of liquid out of the column when the meniscus is level with the top of the gel bed. NEVER LET THE COLUMN DRY OUT. Wash the resin with 10 ml of water to remove the ethanol it is stored in. Then equilibrate the resin with at least 6 mls of lysis buffer containing an additional 1/50th volume of elution buffer (contains 250 mM immidazole, bringing the final concentration to 5 mM).
2. Filter the bacterial lysate supernatant through a 0.45 µm syringe filter. Take a 100 µl
sample for SDS-gel analysis. Then add 1/50th volume of elution buffer (for example if your supernatant is 150 ml then add 3 mls) to the lysate supernatant (contains 250 mM immidazole, bringing the final concentration to 5 mM) and mix well.
3. Stopper the column, apply the lysate to the column allow it to mix with the resin. Allow
the resin to settle then remove the stopper and collect the flow-through. Take a 100 µl sample for SDS-gel analysis.
4. Wash the column with 20 ml of lysis buffer containing an additional 1/50th volume of
elution buffer (contains 250 mM immidazole, bringing the final concentration to 5 mM). Take a sample 100 µl sample for SDS-gel analysis.
5. Wash the column with 20 ml of wash buffer (contains 10 mM imidazole). Take a sample
6. Stopper the column, apply the 2.5 ml of elution buffer (contains 250 mM immidazole) to
the column and allow it to mix with the resin. Allow the resin to settle then remove the stopper and collect the eluate. Repeat two more times. Take a 100 µl sample for SDS-gel analysis from each.
Removal of the imidazole. Your protein will precipitate if frozen in imidazole, so this must be removed IMMEDIATELY after the IMAC purification. 1. Equilibrate a PD10 gel filtration column with 20 ml of 20 mM sodium phosphate buffer
2. Run the buffer into the gel bed until the meniscus is at the top of the gel bed. Close the
tap. Do not leave excess buffer above the gel to dilute the sample, but take care not to let the top of the gel bed dry out.
3. CAREFULLY apply 2.5 ml of your sample with a pipette. Re-open the tap and run the
sample into the gel bed, closing the tap when the meniscus is level with the top of the gel bed. Once the sample is loaded CAREFULLY pipette 3.5 ml of buffer onto the top of the gel bed and collect the sample until the meniscus is level with the top of the gel bed again.
4. Re-equilibrate the column and repeat the gel filtration until all three fractions from the
5. Take 100 l aliquots of each fraction for subsequent analysis by nanodrop and by SDS-
PAGE – freeze these unless doing the analysis immediately. Store the remaining protein frozen for the later use.
Day 5 SDS-PAGE analysis: 1. Prepare a SDS-PAGE gel having 15% lower gel and 7% upper gel (Appendix 1) 2. Thaw the samples on ice. 3. Determine protein concentration of all samples using the Bradford protein assay (see
appendix 2) and all samples from the elution from the IMAC and gel filtration columns by measuring the absorbance at 280 nm using the nanodrop (do NOT put lysates or IMAC washing samples onto the nanodrop).
4. Prepare samples for SDS-PAGE according to appendix 1. Use 50 µg of protein, except
that from the purified fractions use 5 µg.
5. When running the SDS-PAGE be careful you do not run the dye front off the gel. 6. Stain the gel with Coomassie as described in the Appendix 1.
Lysis buffer: 50 mM Sodium dihydrogen phosphate, 0.3 M NaCl, pH 8.0 (adjusted with
Washing buffer: 50 mM Sodium dihydrogen phosphate, 0.3 M NaCl, 10 mM imidazole, pH
Elution buffer: 50 mM Sodium dihydrogen phosphate, 0.3 M NaCl, 250 mM imidazole, pH
8.0 (adjusted with NaOH), and add H20 to 250 ml
Filters 0.45 or 0.2 µm. Syringes for filtering.
Ampicillin: 100 mg/ml (made in water and filter sterilised)
Chloramphenicol: 35 mg/ml (made in ethanol)
LB, per student 1 x 20 ml LB media in a 100 ml conical flask plus 1 x 400 ml LB media in a 1
Experiment 2. ANALYSIS OF ENZYME KINETICS
BACKGROUND: See lectures and lecture handouts for background information on enzyme kinetics In this experiment you will study the kinetics of the enzyme acid phosphatase and its inhibition. The reaction being followed is the degradation of p-nitrophenyl phosphate (4- nitrophenylphosphate) substrate to inorganic phosphate and p-nitrophenol. p-nitrophenol formation is detected by spectrophotometric assay (intensity of color at the wavelength 400 nm). The experiment is developmental. First you must construct a standard plot for p-nitrophenol which you will use for all subsequent analysis. Next you will examine the initial velocity of the catalysed reaction under non-saturating substrate conditions, specifically looking at the effect of enzyme concentration on the rate of reaction. Next the reaction velocity will be evaluated under varying substrate concentrations allowing the calculation of Km and Vmax. will be determined as well as reaction inhibition. EXPERIMENTAL PROCEDURE 1. p-Nitrophenol standard plot.
0.25, 0.5, 1.0, 2.0, 3.0, 4.0 and 5.0 ml of p-nitrophenol work solution is pipetted in duplicate test tubes, after which the volume in each tube is adjusted to 5.0 ml with 0.1 M NaOH. Absorbance is determined at the wavelength 400 nm using 0.1 M NaOH as blank.
2. Investigation of the initial velocity in unsaturated substrate conditions
You need all together eight test tubes for each different enzyme concentrations. Pipette
first substrate solution and water. For pre-warming, have tubes on water bath at 37C for about 5 minutes before adding the enzyme solution to start the reaction. Incubate the reaction mixtures at +37ºC. Stop the reaction after 0, 2, 4, 8, 15, 30, 45 and 60 minutes by adding 4.0 ml of 0.1 M NaOH. Then assay for absorbance at 400 nm using the tube without enzyme as blank.
3. Determination of Km, Vmax and Ki -values.
At first, determine an appropriate reaction time (linear part of the reaction curve) with the highest concentration of the substrate and choosing from the range of 0, 2, 5, 10, 15, 20 and 30 minutes. Then, prepare the actual assay series with duplicate samples as follows:
Test tube n:o
In addition, prepare a series of samples (duplicate samples), where water has been replaced with 0.1 ml of 2.0 mM KF (inhibited reaction). Use the time obtained previously as a reaction time and incubate at 37C. Start and stop the reactions as described in the step 2. Determine absorbance at 400 nm using the tube without substrate as blank.
- 0.1 M NaOH - p-Nitrophenol stock solution: 6 mM p-nitrophenol in 0.02 M NaOH (16.7 mg/20 ml) - p-Nitrophenol work solution: the stock solution diluted 1:100 in 0.1 M NaOH - 0.1% Bovine serum albumin (BSA) water - 1)Enzyme solution: 4 mg Wheat germ acid phosphatase/ 20 ml 0.1% BSA - 50 mM Sodium acetate buffer solution, pH 4.8 - 1)Substrate solution I: 5 mM p-nitrophenyl phosphate in the buffer, pH 4.8 (46.3
- 1)Substrate solution II: 0.5 mM pNPP (substrate solution I diluted 1:10 in the buffer,
1)Enzyme and substrate solutions are prepared just before use and kept on ice (0-4C).
Experiment 3. CRYSTALLISATION OF LYSOZYME
BACKGROUND Crystallising a protein is a prerequisite for determining its crystal structure. Very high purity is required to prepare crystals with good quality and in an ideal case, the sample should not contain any other proteins. The crystallization conditions have to be determined by trial and error for every protein because exact conditions cannot be predicted. In practice, pH, precipitate and its concentration, temperature etc. are varied until crystals with adequate quality have been grown.
Protein structures are determined because they give information on the chemical environment and enzyme catalysis mechanism of proteins. Exact positions of atoms can often be determined from crystal structures. This gives very detailed information on the function of the protein.
PURPOSE OF THE EXPERIMENT The actual structure determination process is a relatively big task and cannot be done during this experiment. As an introduction to protein crystallography and protein analysis, a purified protein can nonetheless be crystallized. As high purity is required for proteins to crystallise it, crystallization can also be thought of as an indication of the purity of the protein.
In this experiment, hen egg white lysozyme will be crystallised. This protein is commercially available and its purity and crystallisation conditions are known. During the experiment variable crystallisation conditions will be tested by the group. At the end of the course, results from all of the students in the group will be combined and the importance of each variable in crystallisation evaluated.
EXPERIMENTAL PROCEDURE Each group prepares the experiments according to the instructions below and makes observations on the drops using a microscope. All observations are written down in a common note book. Use the following nomenclature:
a) The drop is clear (no crystals) b) The drop contains precipitate but no crystals
c) The drop contain both precipitate and crystals d) The drop contains many small crystals e) The drop contains only one or few biggish crystals f) The drop contains crystals grown together or otherwise defected g) The drop contains one single crystal
The best result is obtained when there is only one big crystal in the drop.
Each pair prepares each of the two screens shown below to +4°C (= cold room) and to +22°C (= lab). The first screen is meant for studying the effect of protein concentration in various NaCl concentrations in the constant pH. The purpose of the second screen is to study the effect of pH in a constant protein cncentration. Constant pH of 4.7
Constant protein concentration of 20 mg/ml
1. Set the experiments in PVC trays with 12 wels. The final volume of the precipitant
solution is 1 ml. For example, pipette 300 µl of solution A and 700 µl of solution B to get 1 ml of 7% NaCl solution. Mix by pipetting up and down.
2. After preparing all precipitant solutions, grease the edges of each well using vacuum
grease and a syringe. The purpose of the grease is to seal the well and to prevent evaporation. Avoid using too much grease and try to keep the grease away from the well solution.
3. Set some siliconised cover slips over the lid of a sandwich box or on tissue papers. Pipette
4 µl of precipitant solution from the well in the middle of the cover slip. Add 4 µl of protein solution in each drop to get a drop with a total volume of 8 µl. Pipette up and down for a couple of times to mix the solution. If there are air bubbles in the drop, they can easily be broken using the tip of a needle. Finally turn the cover slip upside down and set it on the well (the same well from which you took the precipitant solution) so that the drop is hanging inside the well. Carefully press the edges of the cover slip against the grease so that you create an air-tight crystallisation chamber.
4. Place the tray inside a sandwich box and make sure you know which drop is which. Cover
the box with a lid and set aside in a place with little disturbance (vibration, temperature changes) in the cold room or at RT. Try moving the box as little as possible. You should get crystals in most conditions within a few days. Observe the drops through the box using a microscope and write down what you see in each drop. Make observations daily.
5. At the end of the practical course you can leave the crystals in the lab or in the cold room.
0.2 M Na-acetate/acetic acid buffer, pH 4.7
0.2 M Na-acetate/acetic acid buffer, pH 4.4
0.2 M Na-acetate/acetic acid buffer, pH 5.0 Experiment 4. IMMUNOPRECIPITATION AND WESTERN ANALYSIS OF CDK2
The aim of the experiment is to immunoprecipitate cdk2, a 34 kDa protein protein from HeLa cell extract, using cdk2-specific antibodies. In addition, to confirm specific precipitation, a control precipitation is performed using preimmune antibodies. Precipitated cdk2 can be detected by Western analysis.
Day 1
Preclearing
Do all steps on ice or in the cold room!
1. Take ~300 µg of HeLa cell extract into each of two Eppendorf-tubes. Make up each to a
final volume of 200 µl by adding cold Triton X-100-immunoprecipitation buffer.
2. Add 0.5 µl preimmune rabbit serum (10 mg/ml) to each tube and incubate for 1h on a
shaker in the cold room (preclearing step).
3. In a separate tube prepare a 10% Protein A Sepharose suspension into Triton X-100
immunoprecipitation buffer. You need only 100 µl of suspension. Let the suspension swell for 1h in the cold room on a shaker. Spin the swollen suspension (14000 rpm, 1 min, +4C) and suspend again in 100 µl of immunoprecipitation buffer.
4. Add 50 µl of swollen protein A Sepharose suspension into the two immunoprecipitation
tubes (from step 2). Incubate for 1 h on a shaker at +4C, spin down (14000 rpm, 1 min, +4C) and transfer the supernatants into new cold tubes.
SDS-PAGE (see instructions below) can also be prepared during the first day.
Immunoprecipitation
Perform all steps on ice or in the cold room!
5. Add the following antibodies:
To tube 1 add 2.5 l anti-cdk2-antibodies (0.2 mg/ml) To tube 2 add 0.5 l preimmune rabbit serum (ca.10mg/ml) for the control precipitation Incubate O/N on a shaker (+4C)
Day 2
6. Prepare a 10 % Protein A Sepharose suspension into Triton X-100 immunoprecipitation
buffer. You need only 100 µl of suspension. Let the suspension swell 1h on a shaker in the cold room. Spin the swollen suspension down (14000 rpm, 1 min, +4C) and suspend into 100 µl of immunoprecipitation buffer.
7. Add 50 l of swollen protein A Sepharose suspension into two immunoprecipitation tubes
(Step 5). Incubate for 1h on a shaker at +4C and centrifuge the samples (14000 rpm, 1 min, +4C). Remove the supernatants carefully and save the pellet.
8. Wash the precipitates 4 times using 1ml of Triton X-100- immunoprecipitation buffer.
Spin the sample down between washes. Finally, remove and discard the supernatant carefully.
9. Add 20 l of 5 x SDS-sample buffer on the pellets (just add, do not pipette up and down). 10. Analyse the sample on a SDS-PAGE gel immediately or freeze the samples for later
SDS-PAGE and Western analysis 1. Cast a 12% mini-gel according to the appendix 1 (this can be done during the first day) 2. Load the following samples in the wells. Before loading remember to boil for 3-5
1. cdk2-immunoprecipitation sample (all) 2. control sample (all) 3. pre-stained molecular weight markers 5 l
3. During the electrophoresis prepare 1 litre of blotting buffer (let cool in the cold room), cut
6 filter papers (slightly bigger than the gels) and a piece of nitrocellulose membrane (use gloves when handling the membrane).
4. After the electrophoresis, remove the smaller glass plate, remove the concentrating gel
and transfer the gel in the blotting buffer for 15 minutes on a shaker. Keep the nitrocellulose membrane in the blotting buffer for at least 5 minutes.
Note! Instead of using nitrocellulose membrane, a PVDF membrane (like Immobilon P) may be used in blotting. In this case the highly hydrophobic membrane must be dipped into absolute ethanol before transferring into blotting buffer. 5. Assemble the Western blot- equipment. Set the papers, the gel and the membrane on the
- Fiber pad - 3 layers of filter paper (moisten in the blotting buffer first) - Gel - Membrane (use gloves) - 3 layers of filter paper - Fiber pad
Note: the locking gel cassette clamping system can be constructed in two different ways. The gel should be against the BLACK face. 6. Transfer the proteins on the membrane in the cold room. Keep an ice block in the buffer
tank during electro blotting (100V, 2h).
7. After the transfer, cut one corner away from the gel, move the membrane into a small vial
keeping the protein side up. Rinse a couple of times using dH2O to remove salts.
8. Prepare the blocking buffer (ca. 50 ml /membrane) 9. If you have not used the pre-stained MW standards in the SDS-PAGE experiment, stain
the standards using 0.1% Ponceau S – solution for 30 seconds. Collect the staining
solution for reuse. Remove excess stain from the membrane using dH2O and cut the markers away. Let the marker strip dry on tissue paper and incubate the rest of the membrane for 1h in blocking solution on a shakers
10. After blocking, wash the membrane 3 x 10 min using 1 x TBST buffer. 11. Prepare antibody solution I:
12. Pour the antibody solution I over the membrane and incubate O/N in a covered vial on a
Day 3
13. Wash the membrane 3 x 10 min using 1 x TBST buffer 14. Prepare antibody solution II:
15. Pour antibody solution II over the membrane and leave on a shaker for 2 h. 16. Wash the membrane 2 x 10 min using 1 x TBST buffer and 2 x 10 min using AP buffer
3 ml AP buffer 30 l NBT staining solution 30 l BCIP staining solution
18. Pour the staining solution over the membrane and stain until the protein band of the cdk
immunoprecipitation sample is visible (1min).
19. Stop the staining reaction by rinsing the membrane several times with dH2O. Finally,
leave the membrane in water for about 10 minutes and leave on tissue paper to dry.
Results
Study carefully the membrane. Which bands you can see? Are the results expected?
HeLa cell extract (4.2 mg/ml, in 80 µl aliquots, prepared 5.10.2012 by Dr Elitsa
Triton X-100 immunoprecipitation buffer (150 mM NaCl, 1% Triton X-100, 50 mM
Blotting buffer (25 mM Tris, 192 mM glycine, 20% ethanol). Prepare just before use!
Blocking buffer (5% milk powder in TBS buffer) Prepare just before use!
10xTBST (500 mM Tris pH 7.5, 1.5 M NaCl, 0.5% Tween 20). Dilute before use!
AP buffer (0.1 M Tris, 0.5 mM MgCl2 pH 9.5)
Appendix 1
Running a Bio-Rad Mini Gel electrophoresis
1. Casting the gel Use the cassette stand for gel casting. Each manufacturer makes different kinds of stands but the basic principle to assemble the cassette is the same. Place the glass plates so that the bigger one is behind and against the transparent plastic wall. The spacers are placed between the glass plates and the smaller plate is on the spacers so that it is facing “outside” when in the gel casting stand. Leave the screws loose and place the cassette on the table so that the lower part is tightly against the table surface. Slowly tighten the screws and make sure that the edges of the glass plates and spacers are on the same level against the table. Finally, place the cassette in the casting stand and make sure the lower part of the cassette is tightly against the rubber (add parafilm if necessary). Slide the comb between the glass plates and draw a line about 5 mm below the comb to mark the upper level of the gel. Pipette the gel between the glass plates to the indicated level using a 5 ml pipette. Add some dH2O or 0.1% SDS solution on the gel to prevent drying. After the gel has polymerised, suck the excess liquid away using a strip of filter paper. Pipette the concentrating gel on the lower gel so that you completely fill the remaining space between the glass plates. Carefully set the comb against the liquid surface in horizontal position and then lift it up against the transparent plastic wall so that no air bubbles are left under the comb. Finally, slide the comb in its place while watching out for air bubbles. After the gel has polymerised, remove the comb slowly. Remove the gel from the stand and attach in the upper buffer chamber. Set the cassettes so that the gel is in contact with the buffer in the upper chamber. Note! Handle -mercaptoethanol and TEMED in the hood.
2. Running the gel Fill the upper buffer chamber so that the surface of the buffer reaches the midpoint between the bigger and smaller glass plate. Add sample buffer and boil for 3-5 minutes (or heat at 95 degrees in a heat block) before loading. Run 200V, 45-60 min until the dye front has run to the bottom of the gel. 3. Staining Stain the gels for 25 min on a shaker (or ~1 min in the microwave own) and using the Coomassie staining solution. After staining, remove the excess stain using dH2O and finally remove unbound stain by using the destaining solution (~2 x 50 ml for each gel). Change destaining solution after 30 min.
Solutions: Note! Add APS and TEMED just before casting the gel. Lower
1.875 M Tris-HCl, pH 8.8
1.25 M Tris-HCl, pH 6.8
6.25 µl 6.25 µl 6.25 µl 6.25 µl 6.25 µl
0.1% SDS (remember to add if not in the stock)
Destaining solution: 10% acetic acid 20%
Appendix 2 DETERMINATION OF PROTEIN CONCENTRATION
Bradford protein assay (Bio-Rad) Standard: 1 mg BSA / 10 ml H2O (0.1 mg/ml) Make duplicate samples to minimize the influence of pipetting errors on the results. Standards:
1. Pipette standards and samples (if necessary from dilutions) to the Eppendorf tubes. 2. Add 0.2 ml Bradford-reagent. 3. Vortex. 4. Wait 5 minutes. 4. Determine OD595 using plastic cuvettes. Blank: 0.8 ml H2O + 0.2 ml Bradford reagent. Amount of sample used for the assay (10-30 µl) depends on protein concentration. Absorbance should be smaller than the value in the biggest standard concentration. If absorbance is higher than the value from the biggest standard, pipette less sample, or if necessary dilute samples first.
Appendix 3 TRANSFORMATION
Transform the plasmid encoding your mutant protein to BL21(DE3)pLysS strain for bacterial
1. Take 200 l of frozen competent cells from the -70 oC.
3. Add ~50 ng (few l) of your plasmid DNA and mix gently.
4. Incubate the transformation mixtures on ice for 30 min. In the meanwhile place the
SOB medium at 37 oC to pre-warm and turn on the water bath.
5. Incubate the transformation mixtures at +42 oC water bath for exactly 45 sec, do not
shake. Rapidly transfer the tubes onto the ice. Allow the cells to chill for 2 min, do not
6. Add 400 l of the SOB medium and grow the bacteria at +37 oC shaking for an hour.
7. Take two LB-plates containing ampicillin 100 µg/ml and chloramphenicol 35 g/ml to
37 oC room to dry. Leave the lids slightly open.
8. Mark the date, the bacterial strain, the sample and your name to the bottom of the
plates. Take 100 l of the culture and plate to one of the LB-plates. Spin down the rest
of the cells, remove 400 l of the culture medium with a sterile pipette and suspense
the cells to the remaining medium and plate onto the other LB-plate. When the
medium has absorbed, place the plates to +37 oC culture room up-side down and leave
Appendix 4
Students to make the following solutions on day 1 (the amounts are for the whole course): For experiment 1: Lysis buffer – 2 litre
For experiment 2: 0.1M NaOH – 3 litres
For experiment 3: Solutions A, B, C, D, E, F:
For experiment 4: Triton X-100 immunprecipitation buffer - 500 ml Store at +4 oC For SDS-PAGE 10x Running buffer – 1 litre
Appendix 5 THE WRITE UP
No methods sections are required UNLESS you make a significant deviation from the methods outlined in the practical manual. Each practical has a results and comprehension section associated with it and both must be answered. Practical 1
RESULTS: Table I: Protein assay (Show your measured absorbances (also UV), including the standard
Figure 1: The standard curve of Bradford assay
Figure 2: SDS-PAGE indicating stepwise purification of the protein.
Table II: The concentration (in mg/ml AND in M) of your protein determined by Bradford
Comment the results. How well the purification succeeded, what is the purity of your target protein, and what is the total yield in mg? Is the molecular weight of the target protein well in line with the theoretical value? Compare the concentrations measured by two different techniques. COMPREHENSION
1. What would happen in practical 1 under the following circumstances:
a) No chloramphenicol was added to the main culture b) Ten fold excess of ampicillin was added to the main culture c) If the washing buffer contained 50 mM 5-aminoimidazole-4-carboxamide
ribonucleotide (an intermnediate in purine biosynthesis)
d) The lysis buffer was made at pH6.0 instead of pH8.0
Practical 2
RESULTS:
From section 1 include: p-Nitrophenol standard plot (Table I and Figure 1): A400 versus nmol p-nitrophenol (pNP).
Detail the results you obtained from your data in section 2. Include:
A. Curves for reaction velocities (Table II and Figure 2): pNP (nmol) versus reaction time in each concentration of the enzyme. B. Determination of the initial velocity (Table III and Figure 3): velocity (nmol/min) versus reaction time in each concentration of the enzyme. Ordinate (y-axis) values can be derived from the figure in step A by calculating nmol/min for certain intervals of time (e.g. for 0.5, 1, 2 or 5 minutes; importantly choose values also from the part of the curve rising fastest) for each concentration of enzyme. Initial velocities for each concentration of the enzyme is obtained by extrapolating to the time point zero (t = 0). C. Correlation plot (Table IV andFigure 4): velocity versus the amount of enzyme at different time points (t = 0, 2, 4… minutes).
Detail the results you obtained from your data in section 3. Include:
A. Determination of the reaction rate (Table V and Figure 5): nmol pNP versus time. B. Reaction velocity curve for both uninhibited and inhibited reactions (Table VI and Figure 6): velocity (nmol/min) versus substrate concentration (mM). C. Determination of Km and Vmax by direct means OR linear extrapolation (e.g. Lineweaver-Burk plots). Include your graph (Table VII and Figure 7). D. Summary table (Table VIII) including the Km, Vmax values for the inhibited and uninhibited reactions. Include also the calculated value for the inhibition coefficient, Ki.
Always show your working and present the original data! COMPREHENSION
1. What type of inhibition would you expect (and why) for regulation of a metabolic pathway by:
a) Product inhibition of a enzyme by its own product b) Product inhibition by the final product of multi-enzyme pathway on the first
2. The crystal structure of ribonuclease G2 with the competitive inhibitor UpcA bound was determined and part of the binding site is shown below, with the approximate positions of ribonuclease G2 side chains indicated:
a) Why would the following mutations be expected to decrease the affinity of ribonuclease G2 for UpcA: Lys 324 -> Glu Gln 217 -> Val Trp 356 -> Val The only difference between UpcA and a natural substrate UpA the replacement of the phosphodiester bond of UpA with a phosphonate bond at the position indicated with an arrow. b) The Lys 361 -> Gln mutation in ribonuclease G2 severely decreases the catalytic turnover of the enzyme. Give one possible explanation for this effect.
Practical 3
RESULTS
Show your crystallization results with tables (Tables I-IV). Comment on them. What are the optimal conditions for lysozyme crystallization according your experiments? COMPREHENSION
1. Explain how high salt concentrations increase the propensity of proteins to form crystals. 2. Which will provide a more accurate picture of the physiological structure of a protein (and why), structure determination by NMR or by x-ray crystallography? 3. Explain 2 factors which might prevent a protein from crystallizing and why these factors have this effect. Practical 4
RESULTS:
Figure 1: Immunoprecipitation of cdk2. Table I: SDS-PAGE analysis of the samples. Figure 2: Molecular weight standard curve. Determine the molecular weights of the proteins detected by the Western analysis using the molecular weight standars. Include the travelled distances and molecular weights of the standard and sample proteins to Table I.
Comment on the results. Which bands you see on the membrane and why (if nothing is seen, explain what you should)? Determine the molecular weights of the bands. How well your immunoprecipitation worked? How specific was the antibody? COMPREHENSION
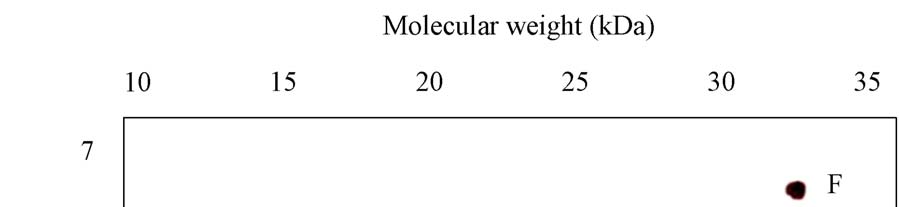
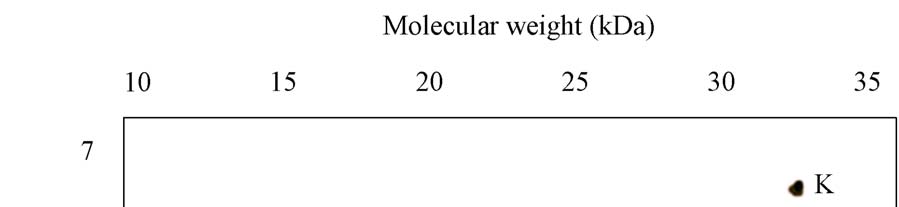
A novel protein disulphide isomerase (PDI) has been identified from Coprinus domesticus. The mature protein has a predicted molecular weight of 24.6 kDa and a predicted pI of 4.86. Recombinant expression of C.domesticus PDI in E.coli allowed for the generation of a polyclonal antibody against the protein. This antibody when then used in a series of immuno- precipitation experiments and the precipitated proteins analyzed by 2D-gel electrophoresis with the first dimension being isoelectric focusing and the second dimension being non- reducing SDS-PAGE. The results are shown in Panels 1-5 with the position of pI and mw markers being indicated. (i) Explain possible reasons for the differences observed between the three samples, specifically explaining what spots A-K may represent (ii) Explain how you could test the hypothesizes you proposed in answer to part 1
Panel 1: Sample of purified mature PDI recombinantly expressed in E.coli
Panel 2: Sample precipitated from ER luminal fraction from C.domesticus
Panel 3: Sample precipitated from whole cell lysate from C.domesticus
Optimizing Pharmacologic Treatment of Psychotic DisordersMEDICATION SELECTION, DOSING, AND DOSEEQUIVALENCE Guideline 1: Selecting Initial Pharmacologic Treatment1A. First-Episode Patient For a first-episode patient with predominantly positive symptoms , the experts consider oral risperidone the treatment of choice. Other recommended medications for this clinical situation are aripiprazole,


 Panel 1: Sample of purified mature PDI recombinantly expressed in E.coli
Panel 2: Sample precipitated from ER luminal fraction from C.domesticus
Panel 1: Sample of purified mature PDI recombinantly expressed in E.coli
Panel 2: Sample precipitated from ER luminal fraction from C.domesticus

 Panel 3: Sample precipitated from whole cell lysate from C.domesticus


