Die Struktur von Tadalafil erlaubt eine selektive Bindung an die Bindungsstelle der PDE5 und minimiert gleichzeitig die Interaktion mit PDE6, was visuelle Nebenwirkungen einschränkt. Seine Verteilung im Organismus erfolgt breit, wobei das Verteilungsvolumen etwa 63 Liter beträgt. Über 90 % des Wirkstoffs sind an Plasmaproteine gebunden. Die Wirkung bleibt unabhängig von der Nahrungsaufnahme konstant. Der Abbauweg über CYP3A4 kann durch Hemmer wie Ritonavir oder Ketoconazol verlangsamt werden, was die Plasmakonzentrationen deutlich erhöht. In diesem Kontext wird cialis 20mg preis häufig in Bezug auf pharmakokinetische Wechselwirkungen erwähnt.
Ngl instruments trainer
NGL Instruments Trainer Should you have any problems during installation or any questions please write us an e-mail to [email protected]
The focus of this program is to learn and to practice the use of radio navigation instruments. ♦ All exercises are flown with the autopilot.
♦ The aircraft always turns to where the heading bug is located.
♦ The aircraft is always holding altitude.
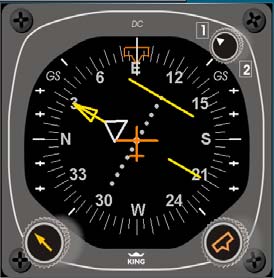
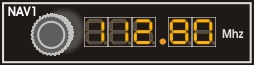
Select instrument to NAV1 or to NAV2. Switch with a single mouse click OBS – Hold left mouse button and move the mouse to the left or right. Do not attempt to turn the button. Heading Select Knob – Hold left mouse button and move the mouse to the left or right. Do not attempt to turn the button.
Through a click on the round knob the next available
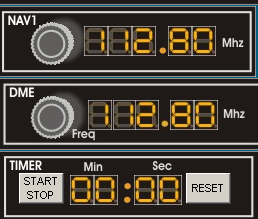
frequency will be selected. On a map there are always two VOR and one localizer frequencies available. The timer is only working while the aircraft is flying. When the simulation is stopped, the timer will automatically stop.
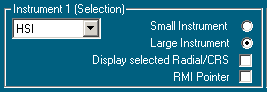
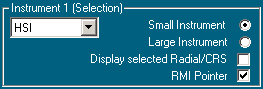
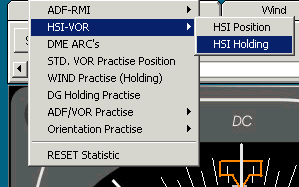
Selection of Instruments Choose between ADF, RMI, Std.VOR, HSI and DG. Start or Stop Simulation: FLY: The simulation is paused. With a mouse click the simulation will be started . STOP: The aircraft flies. With a mouse click the Instruments
Click the Heading Select Knob and hold the left mouse button down. The heading bug reacts to left or right movements of the mouse. To bring the heading bug to the present heading make a double click on the Heading Select Knob. The aircraft always turns to the Heading Bug on the shorter way.
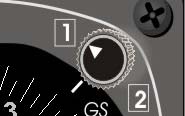
Through a mouse click, the instrument will change from the NAV1 to the NAV2 receiver. The instrument will therefore work with the selected frequency of the NAV1 or with the frequency of the NAV 2 receiver.
Through a mouse click, the instrument will change the indication from Fix to Slave and reverse. If Slave is selected the Bearing Indicator shows the same bearing as the DG. If Fix is selected, each bearing can be chosen with the Heading Select Knob. In practice keep 360° on top.
Click and hold the left mouse button on the OBS, and move the mouse to the left or right. Do not attempt to turn the button
Through a click on the round knob the next available NAV frequency will be selected.
On a map there are always two VOR and one localizer frequencies available.
RMI Pointer On the HSI the RMI pointer is available as on the EFIS display SIM Rate With a SIM rate 0,5, one second flight time will be extended to two seconds. The simulation is running with half speed. The TAS will not change with different SIM rates. Therefore turn radii are always the same regardless to which SIM rate is selected. The timer is running with half of the normal speed when SIM rate 0,5 is selected. With SIM rate 4, 4 second flight time will be displayed in one second. The TAS does not change. The timer is running 4 times
faster. These way long distances can be flown in a fraction of time. Or
holdings can be flown in half of the time with SIM rate 2.
Exercises The real value of this program comes from completing the numerous integrated exercises. Only when you select appropriate tasks will the desired success be achieved. Exercises, tasks, questions out of all ranges of the instrument flight and their solutions are supplied. Depending on the topic you will have to respond to questions or you will be asked to fly a certain situation by means of the program.
The supplied exercises are found in the menu “Question’s and Answers”.
The Question-and-Answer-Q+A dialogues will differ in appearance, depending on the exercise. However, all exercises have a common form, you must respond to the question and the result (right or wrong) will follow. The orientation exercises constitute an exception. There, no question-and-answer window will open. The aim is, to fly these exercises yourself.
Functions during exercise Show results The flown exercise can be replayed anytime in the replay mode. Use the “Start Stop” button or the slide control. See also “Replay”. After checking the replay you may go back to the dialogue of the exercise with “back”. With “show results“ you get all the correct answers. The flown track with the instrument settings used by the author can also be replayed.
Fly it The exercise can be flown by yourself. YOU must set all instruments. If you
want to save the flown exercise permanently select “File” and then Save Session as The performance indicator consistently shows you the distance between your position and the position of the aircraft flown by the author. Continue The next exercise will be loaded. Random The sequence of the exercises will be random. Exit will terminate the exercise module. Exercises
When you retrieve an exercise, “Lock Instruments” is activated. Until all questions have been answered “Hide Airplane is also activated. Only when all questions have been answered correctly the airplane becomes visible. Below the large window you will find comments concerning the solution. The comments can be blanked by activating “hidden” in the same window. By clicking “Show” the text will be shown again. The simulation-speed is varied by “SIM Rate”. With “Start/Stop” the replay mode of the simulation can be started or stopped anytime. By means of the slide control you can directly retrieve data at any point in the replay mode simulation. Exercises - Position The airplane flies straight ahead as soon as you click “Show results”. Exercises to be flown
As soon as you click “Show results” the recorded simulation will be shown including the complete Flight path and the corresponding indicating instruments.
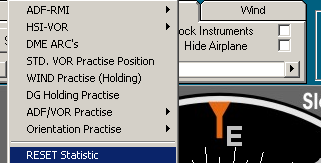
Flyyourself RESET statistic
You must navigate the airplane by means of the Heading Bug. You also have to attend to the selection of instruments, the timing
reset the statistic in “Q + A” – “RESET
Performance Indicator
When you are in an exercise and „Fly it“ is chosen, the performance indicator is displayed on the map. “Lock Instruments” is deactivated. The performance indicator compares the aircraft’s position at any point in time with the position flown by the author. The difference between your position and the Ref position at that point is indicated trough the bar on the performance indicator. As the performance indicator is indicating the distance of two positions However, it does not necessarily give information if you are on a requested track. Ref is the flight path flown by the author. Me: Is the flight path flown by you.
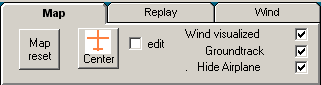
Map Window
The map picture shows the positions of the stations with frequencies and the identity codes. The stations can be moved by using the mouse. The aircraft symbol shows the position and the heading of the aircraft. But only if the box“ Hide aircraft” is not marked.
Position the aircraft Click with the left mouse button to a point on the map. The aircraft moves to the position of the mouse on the map. If the left mouse button is held on, the aircraft’s position is moving with the mouse position. Heading change. Click with the right mouse button to a point on the map. The aircraft is maintaining position, but takes direction to the position of the mouse. If the right mouse button is held on, the aircraft’s heading is permanently Move a station Go with the mouse, to a station. When the mouse symbol is changing to a + push the left mouse button and hold it on. The station is moving with the position of the mouse. Give the localizer a defined direction Go with the cursor to the course indication at the end of the localizer. When the cursor changes to “+“ push the left mouse button and hold it on. The localizer will change direction with the movement of the mouse. Zoom The distance bar shows the size of the distance on the map. With a click on the star the required zoom can be selected. Available zooms: 4 NM, 2 NM, 1NM, 0,5 NM.
Hide aircraft If this box is marked the aircraft is not visible on the map. Effect of wind display Heading track, TAS, GS and the effect of wind will be displayed as a wind triangle. Center Pushing the “Center“ button, the aircraft will be centered on the map. All stations and the flight path are also displayed accordingly. Performance Indicator
If an exercise is flown by you, the performance indicator allows you a comparison of your flight path to the flight
Performance Indicator: The Ref position is the position of the aircraft at a particular time. The difference between your position and the Ref position at any moment is indicated by the bar on the performance indicator. Ref: is the flight path flown by the author. Me: is your own flight path. Stations Every station can be moved to any point on the map. The frequencies cannot be changed. On request certain areas can be delivered via e-mail. Any map produced is limited to 2 VORs, 2 NDBs and one localizer. VORs and the localizer may also have the DME function. The DME function is also available without VOR or localizer, but not additionally. Replay
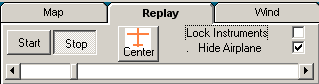
Any exercise flown will have both the flight path and the settings of instruments stored and can be replayed. To save the session permanently use the “Save Session as“ feature. All sessions stored by the author can be loaded by means of “Load Session”. The “Start - Stop” button in the Replay mode will allow you to move to any point in the session. Any with “Fly“ flown exercise is stored and can be replayed. Use the “Start – Stop” button in the replay mode. With the slide control any point in the displayed exercise can be reached.
While “Lock Instruments” is marked all instruments are shown as they have been stored and now cannot be changed. If this window is not marked, any instrument and setting can be modified.
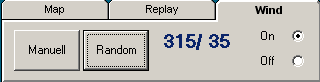
Wind settings On: Only when this spot is marked, wind can be fed. Random: With each click on this button a random wind with direction and speed is selected.
Manual: Once you have clicked on “Manuell” you can draw your
own wind with direction and speed on the map. Therefore you must click the left mouse button and hold. You can then move the mouse to draw a line. The direction of this line corresponds to the wind direction, the length to the wind velocity. The wind triangle is
wind velocity The wind triangle is displayed at the airplane. Heading
and True Air Speed are marked RED. Track and Ground Speed are marked GREEN. The Wind with its direction and velocity are BLUE.
Wind influence graphically: Heading, track, TAS, GS and wind are presented in terms of a wind triangle. This wind triangle is only visible if “Wind visualized” is marked. If the airplane is hidden, the wind triangle will also be hidden. The effect of wind does not change when the picture is hidden. Activation of Software
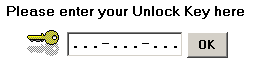
1. Enter serial number after launch of the program.
With the purchase of the software you have got 3 digit serial numbers each containing 16 figures. After having launched the program, you will be asked to enter one of the three 16 digit serial numbers.
2. The PC is creating a unique installation number. The installation number has two times 4 digits and is shown in the orange box.
3. Request the key number with your installation number from the homepage
Click the button "Software-Registrierung" and enter your two times 4 digit installation number. Our server will send you automatically your three times three digit key to your e-Mail address. 4. You will get the key automatically to your e-mail address. 5. Enter the key number .
Your Serial Numbers (!) Please use each serial number only once. We create only one key for each serial number We can also be reached via Fax +43 662 852869 or E-Mail [email protected]
STUDENT'S HEALTH HISTORY (To be filled out by Parents) . Your child's health and well-being is of great importance to us. Please complete this form carefully in order to assist us support child. First Name: Middle : Last Sibling at AIS: Name & Grade: Name of Emergency Contact in Muscat (other than yourself) Telephone # STUDENT'S HEALTH HISTORY Does your child have any of the following
Press Release: A corporate tenant’s failure to submit CIPRO Annual TPN, South Africa’s only specialist property credit bureau and developer of the industry’s first rental payment profile of its kind, has revealed that the latest Company and Intellectual Property Registration Office (CIPRO) report confirms 760 thousand companies and close corporations were deregistered in July. CIPRO i


 NGL Instruments Trainer

 Click and hold the left mouse button on the OBS, and move the mouse to the left or right. Do not attempt to turn the button
Through a click on the round knob the next available NAV frequency will be selected.
On a map there are always two VOR and one localizer frequencies available.
RMI Pointer On the HSI the RMI pointer is
Click and hold the left mouse button on the OBS, and move the mouse to the left or right. Do not attempt to turn the button
Through a click on the round knob the next available NAV frequency will be selected.
On a map there are always two VOR and one localizer frequencies available.
RMI Pointer On the HSI the RMI pointer is 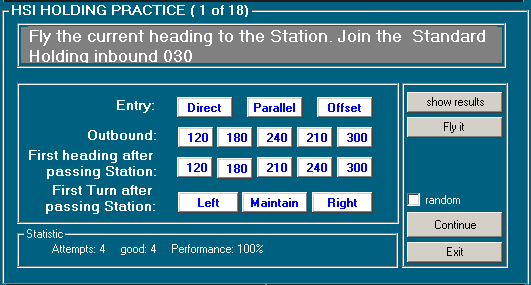

 Functions during exercise


 Performance Indicator


 Activation of Software